Looking for a quick, yet easy crochet border for your blanket? Well, look no further, this crochet tutorial will show you step-by-step how to make a double crochet border for a blanket.
A double crochet border is simple to make and perfect for beginners! It requires only a few steps and is just as easy as a single crochet border.

This post contains affiliate links, which means I make a small commission at no extra cost to you. See my full disclosure here.
So if you know how to make a single crochet border, you can totally make this one!
Double Crochet Border Tutorial for Beginners
This crochet border is perfect for beginners to learn because it requires only one stitch. Unlike other borders, all you have to do is make this stitch all the way around your blanket.
I always recommend making a few of the basic borders first (single crochet, half double crochet, treble crochet) because it will give you a good overview of where to place your stitches.
Plus, you'll also get more comfortable crocheting borders. So this is a great place to start if you're new to adding a crochet border to a blanket.
And if need some crochet pattern ideas for blankets, here are some down below.
Blanket Pattern Ideas for A Double Crochet Border

Materials You Will Need to Make a Border
Since this is just a practice swatch, there’s not much that you need. But here are the things that I used for this border tutorial.
- Practice swatch or current project. I made a basic 4″ by 4″ inch swatch using the suzette stitch and my favorite cotton yarn by WeCrochet.
- 4.0 mm crochet hook. I used a basic wooden crochet hook for this tutorial.
Alright, let’s get started!

How to Make a Double Crochet Border
Step 1: Insert your hook into the last stitch of your last row, and make a double crochet.
If you’re using a different color, reattach your yarn to the last stitch of your last row, chain 3, and make a double crochet in the same stitch you attached your yarn to.
Note – to make a double crochet: Yarn over, insert hook into stitch and pull through, yarn over and pull through first two loops on hook, yarn over and pull through last two loops on hook.

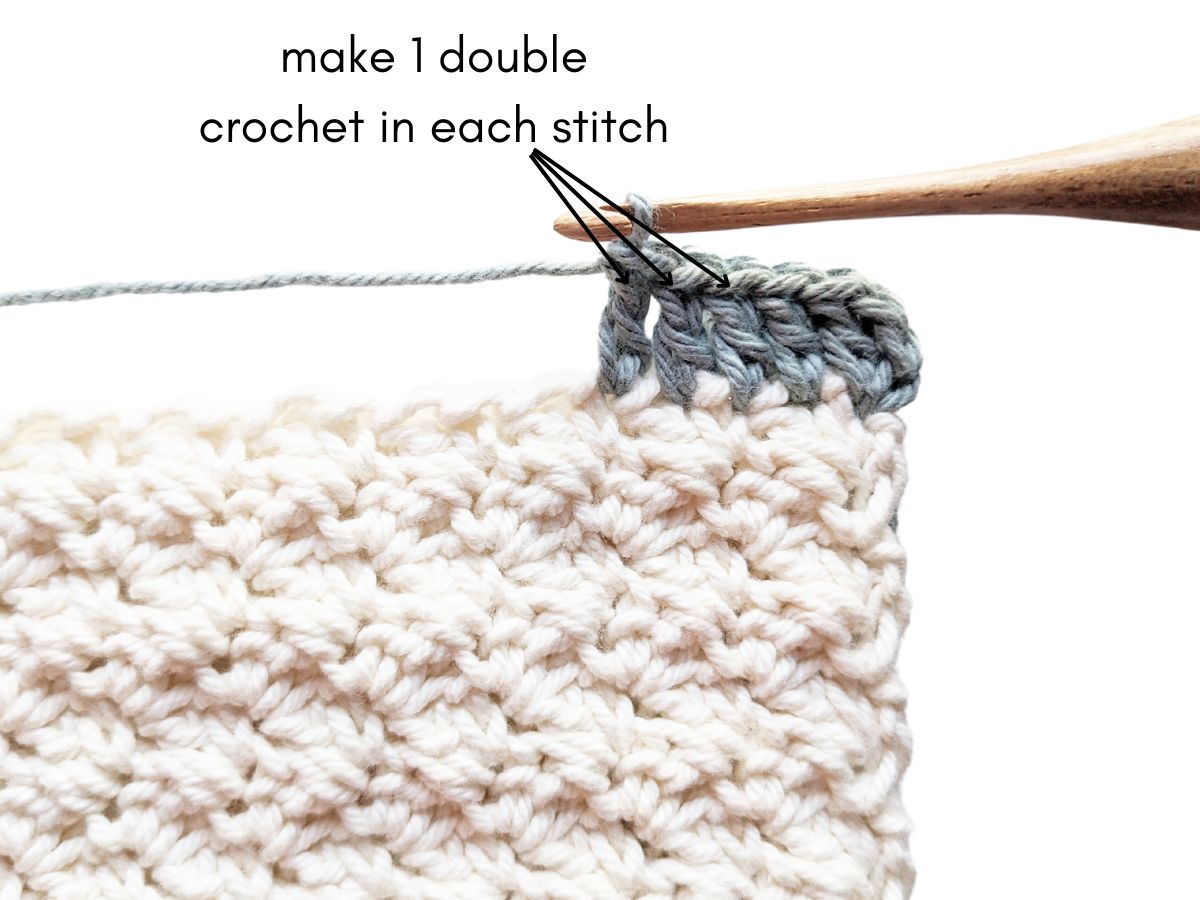
Step 2: Then continue to make 1 double crochet in each stitch across the row.
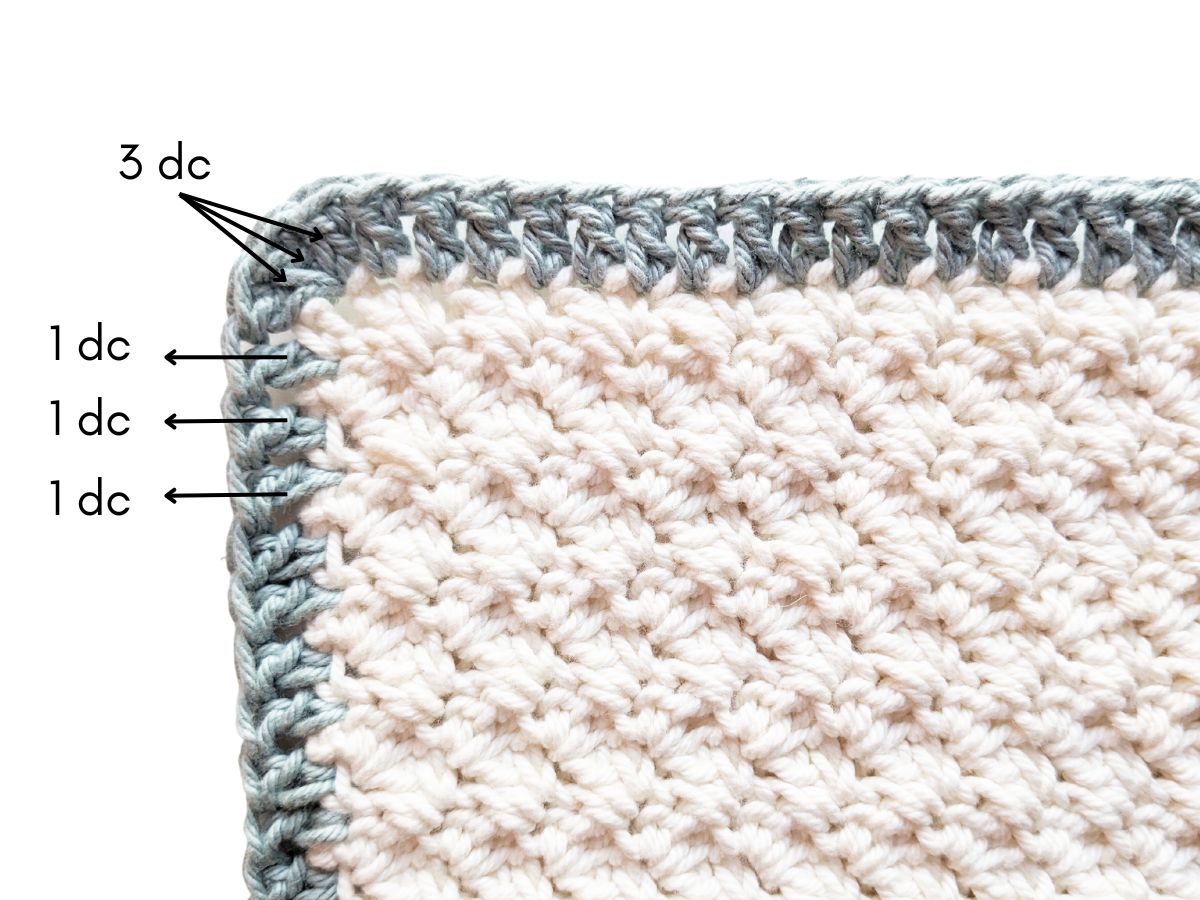
Step 3: Once you have finished one side and you’ve reached a corner, make 3 double crochets in the same stitch.
Note – if you find that your corner is rounding or looks tight, add an extra double crochet stitch.

Step 4: Then continue making a double crochet in each stitch on the side of your crochet project.
Make sure you’re putting just one stitch per row when working on the sides of your crochet project.
Now continue to repeat this sequence all the way around your crochet project. Once you have finished your border, slip stitch to the first stitch.
And that’s it, you’re finished! You can find the video tutorial down below for this tutorial.
If you want to add a second border row to your first row, then follow the next set of steps.

How to Add a Second Row to Your Double Crochet Border
After you have slip stitched your last stitch together to complete the first row, chain 3 (counts as one double crochet). Now follow the next set of steps:

Step 1: Start by making another double crochet in the next stitch. Then continue to make one double crochet in each stitch till you reach the corner stitch.

Step 2: Once you have reached the corner stitch, make a double crochet, then make 2 double crochets in the next stitch, and then make 1 more double crochet in the next stitch. You should have 4 double crochets in the corner.
Alternatively, you can also make a double crochet in the first corner stitch, chain 1, make another double crochet, chain 1, and make one more double crochet to finish your corner.

Step 3: Now continue by working one double crochet in each stitch on the side rows and then repeat step 2 when you reach a corner.
When you're at the last corner, make 2 double crochets. One will go in the next stitch and the other one will go next to the chain 3. You should have 4 double crochets.
Step 4: Then make a slip stitch to the next stitch to complete your second border row.

If you want to add more rows to your border, simply continue to repeat these steps until you have your desired amount of rows.
I hope you enjoyed this tutorial and don’t forget to save this post for future reference.
If you're comfortable making this border and would like to try some other borders, make sure to take a look at the ones listed down below.
PIN IT for later