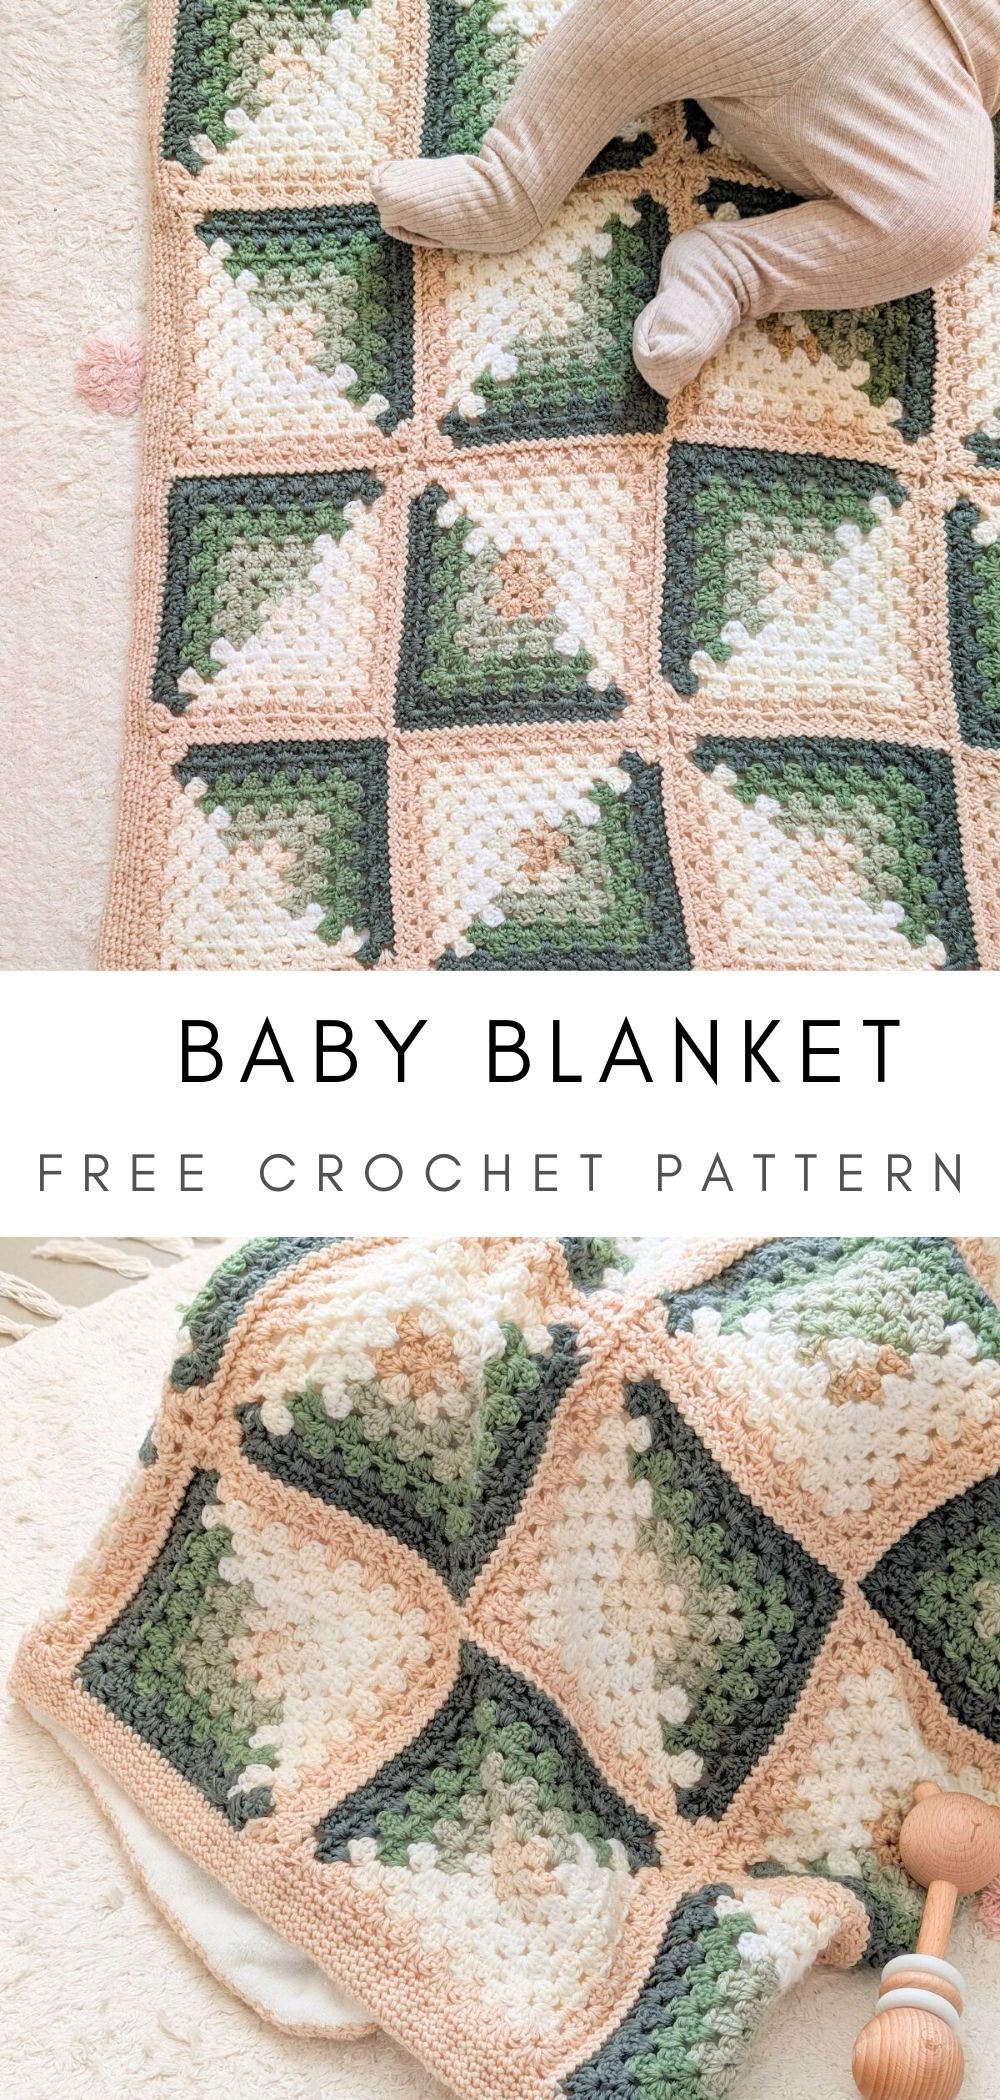
Wrap your little one up in cozy stitches with the Log Cabin Crochet Baby Blanket! This granny square crochet baby blanket is the perfect project for your little one.
It's cozy, cuddly, and sure to become a treasured keepsake. You can find the free baby blanket pattern + guided video tutorial down below, or you can purchase a printable PDF pattern here.
This post contains affiliate links, which means I make a small commission at no extra cost to you. See my full disclosure here.
Free Log Cabin Crochet Baby Blanket Pattern
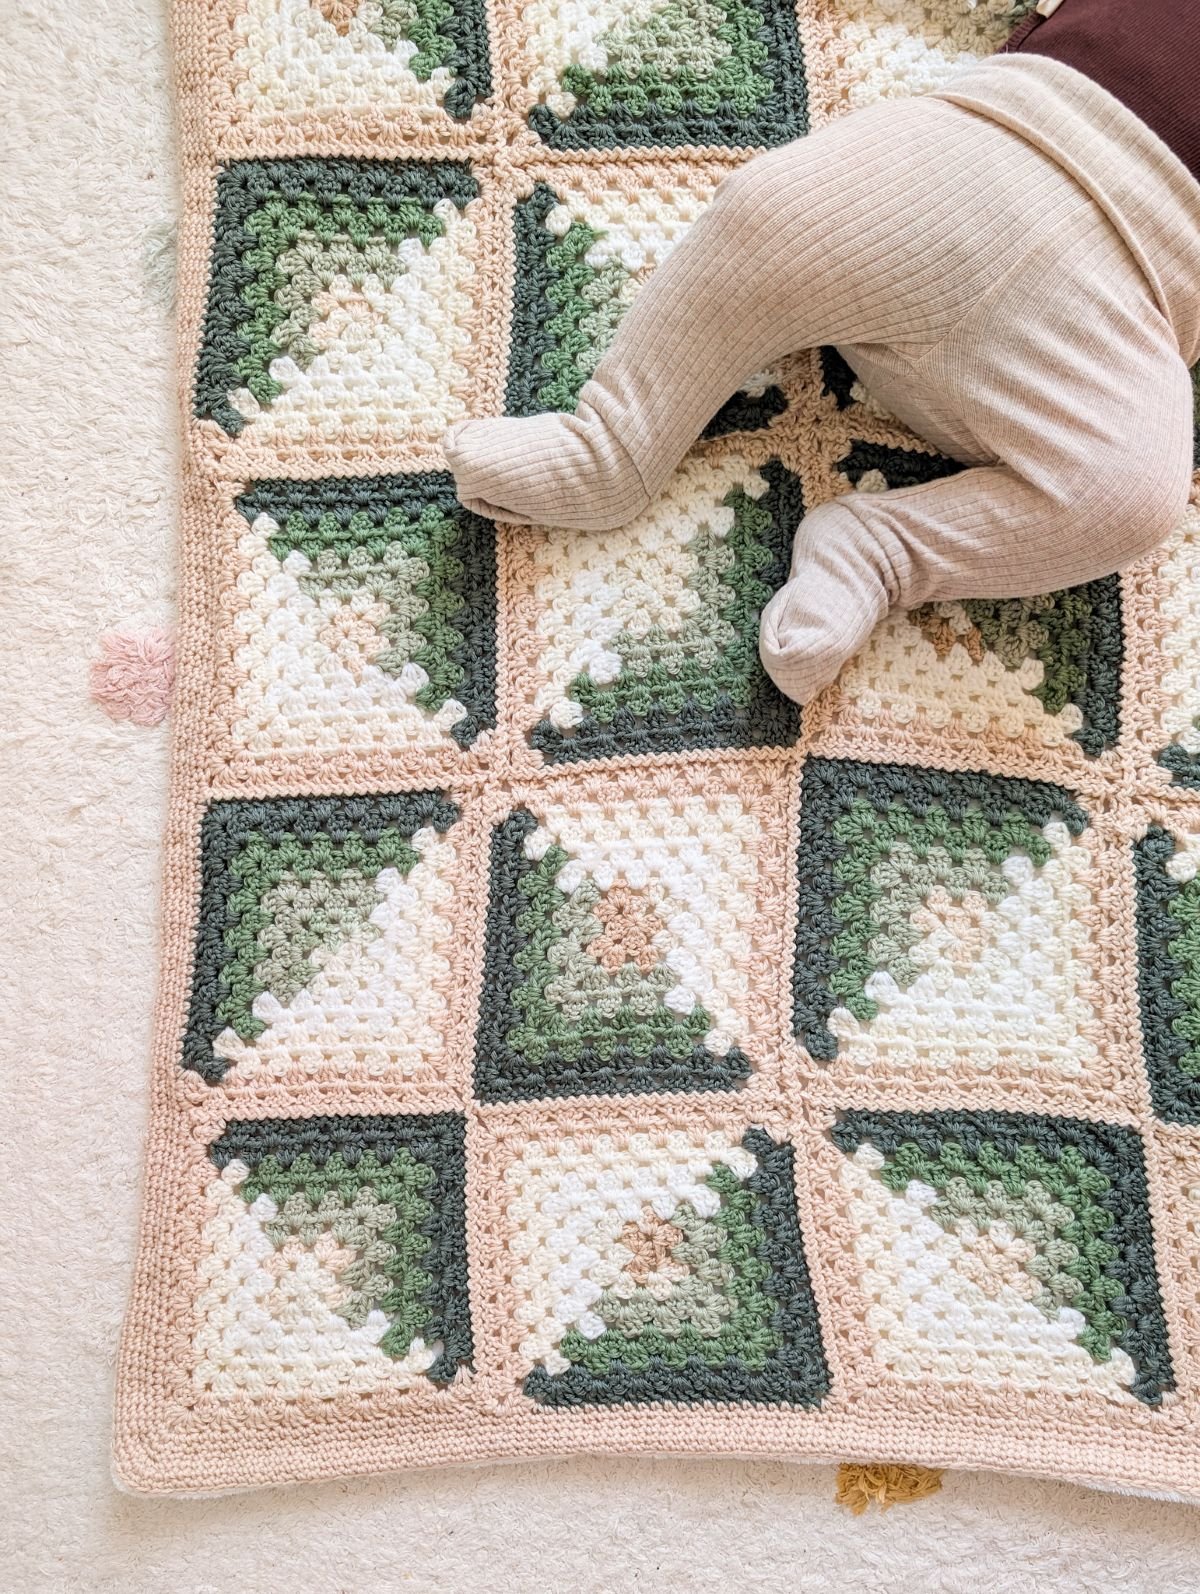
Cozy and cuddly, the Log Cabin Crochet Baby Blanket is entirely made out of granny squares. If you love the look of a patchwork blanket and don't mind working up a few granny squares, I think you're going to love crocheting this blanket.
It's made using your basic crochet granny square but the way you add in your color is what adds that patchwork charm to this project. You work it up in way where you have darker colors on one side of your granny square and lighter colors on the other side of your granny square.

Merging these colors together into one granny square creates a really neat looking baby blanket. Especially since you can play around with the order of your squares when seaming everything together.
So let's go ahead and get into all the things you need to know on how to make a Log Cabin Crochet Baby Blanket.

How to Make a Log Cabin Crochet Baby Blanket
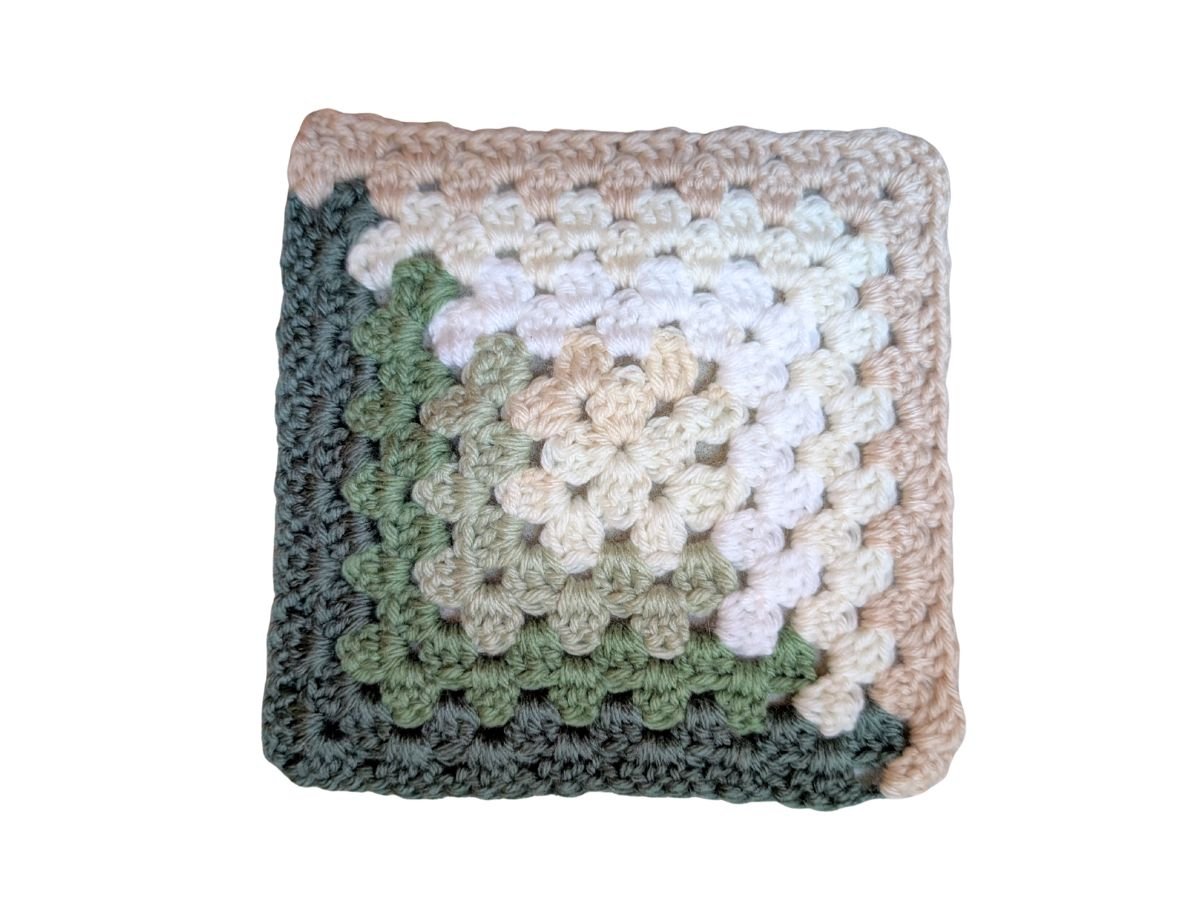
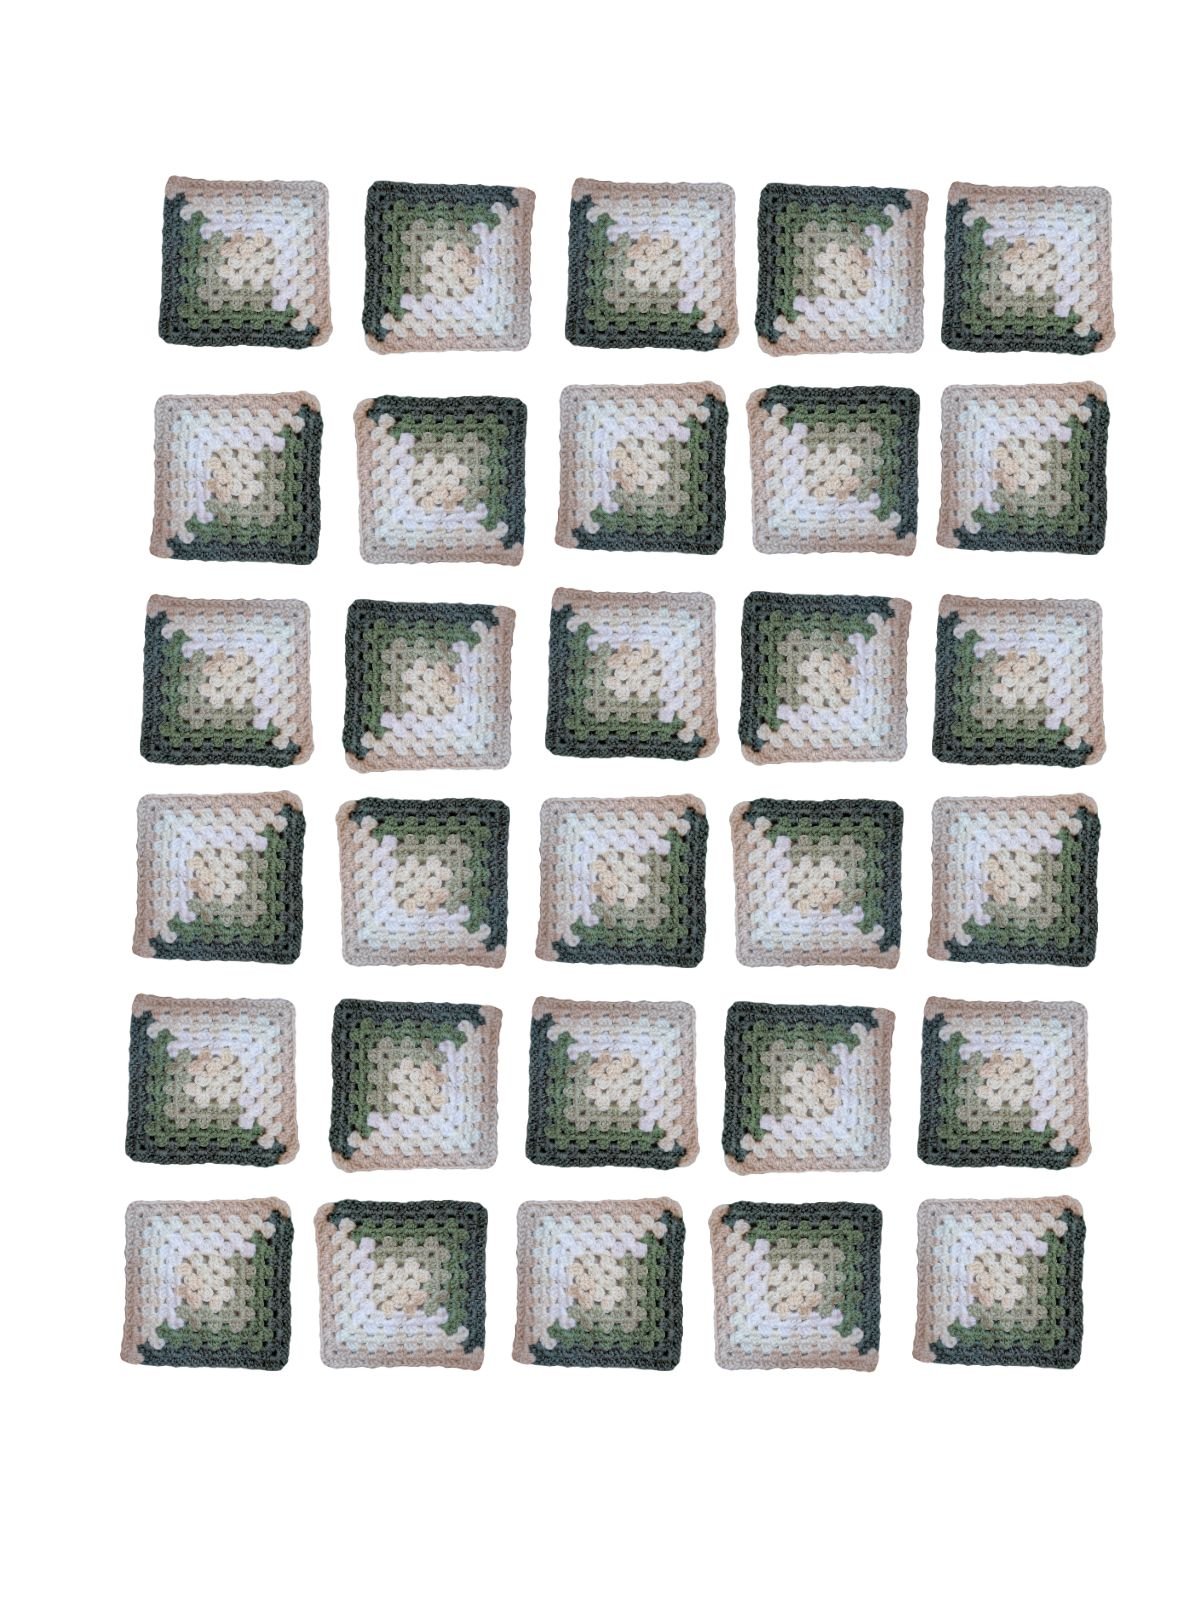
The first step in making this pattern is to crochet 30 granny squares. You're going to crochet a basic double crochet granny square with color changes.
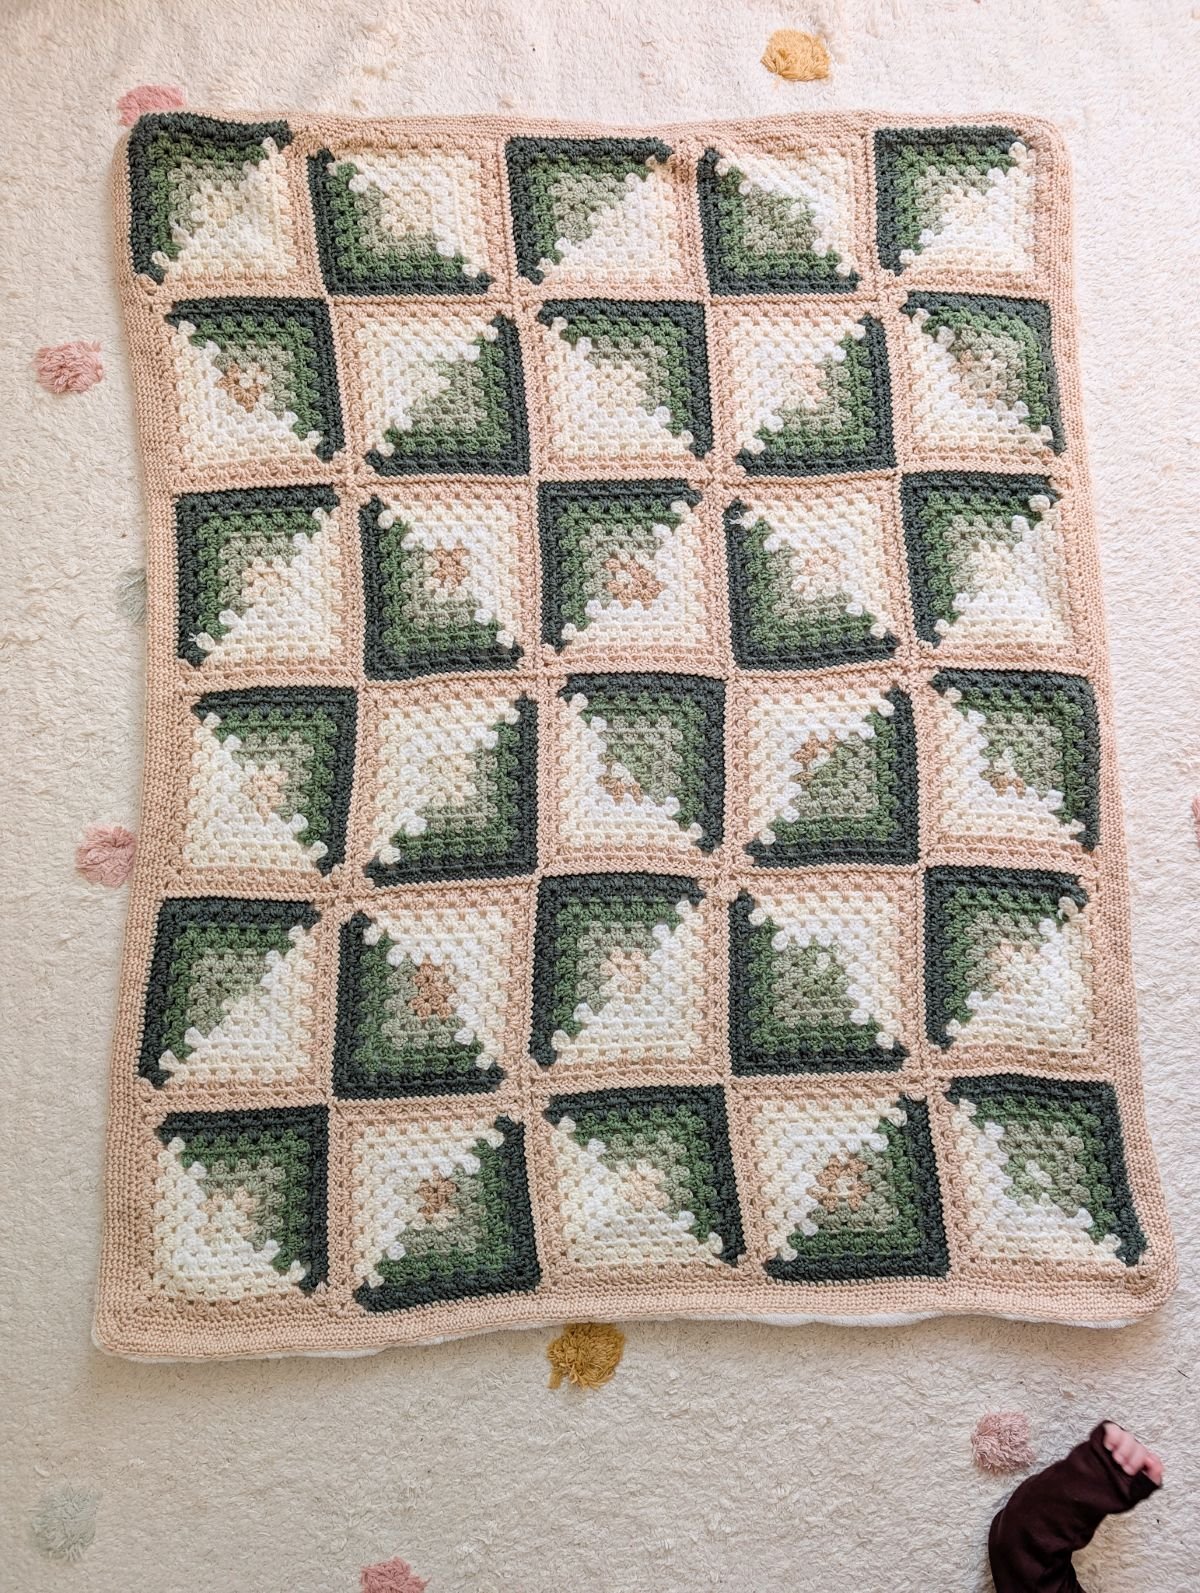
Once you've crocheted 30 granny squares, it's time to put each square together in a certain order. This is where it gets really fun because you can really get creative with the placement of your squares.
I've shown it one way, but there are so many different ways you can place each square. That's the really cool thing about having a granny square that is dark on one side and light on the other side.

Ok, so once you have each square placed, it's time to seam each square together. For this pattern, I've used the zig zag slip stitch method, but you can use any seaming method that you like.
Once you've seamed each square together, it's time for the last part, which is to crochet a pretty border around your blanket. I've kept it simple, and made a single crochet border. This part is of course optional, but I think it adds a lot to the blanket.
And that's it! So let's talk real quick about the yarn you'll need for this pattern.
Yarn
For this free crochet baby blanket pattern, I used Hobby Lobby Baby Bee Yarn. It's a number 3 weight yarn that's super soft and as the name states, it's perfect to use for baby blankets.
It washes really well too! So if you're short on time and can't wash a baby blanket by hand, I highly recommend giving this yarn a try. I tossed my finished blanket in the wash machine on a gentle cycle and laid it out to dry, and the blanket looked good as new!
So it's a great yarn to use for projects that need to go in the wash often. As a first time mom, I cannot tell you how many times I've washed this baby blanket. So I highly recommend this yarn.
Anyhow, I used 7 different colors of yarn for this project. Colors ranging from light to dark. So if you do want to use a different yarn, make sure to pick 7 colors that go from light to dark.
So now that we know how to make this blanket and what yarn is used, let's start our project!
Add the Log Cabin Baby Blanket to Your Ravelry Queue!
Purchase an Ad-Free Copy of the Log Cabin Baby Blanket Here!
Log Cabin Crochet Baby Blanket Pattern
Materials:
- Pattern uses 7 different colored skeins of Hobby Lobby Baby Bee Sweet Delight Yarn (Weight 3 / 4 oz, 377 yds). You will need 1 skein of each color - Angel, Naked, Sand Castle, Jumping Juniper, Baby Sage, Green Light, Shamrock 'N' Roll.
- Size 4.0 (G) mm Crochet Hook.
- Darning Needle.
- Scissors.
Gauge:
1 granny square measures approximately - 6" inch x 6" inch.
Abbreviations:
- ch – chain: Yarn over, pull through loop on hook.
- sc – single crochet: Insert hook into stitch, yarn over and pull through, yarn over and pull through last two loops on hook.
- dc – double crochet: Yarn over, insert hook into stitch and pull through, yarn over and pull through first two loops on hook, yarn over and pull through last two loops on hook.
- sl st - slip stitch: Insert hook into stitch, yarn over, pull through stitch and loop on hook.
- ch sp - chain space.
- corner sp - corner space.
- rep - repeat.
- sts - stitch.
Size:
31" inch x 40" inch.
Note - You can make your baby blanket bigger by adding more squares. You can also make it smaller, by adding less squares. Please note that if you're going to make it bigger, you might need additional yardage.
Pattern Notes:
- Pattern written in U.S Terms.
- You will need 30 squares to make this crochet baby blanket.
- Pattern notes when to switch colors when making each granny square. Color A - Jumping Jupiter, Color B - Angel, Color C - Green Light, D - Naked, Color E - Baby Sage, Color F - Shamrock N' Roll, Color G - Sand Castle.
- Pattern includes two graphs. The first graph shows how to place each granny square and the second graph shows you an actual image of what your granny squares should look like when all granny squares have been put in the right order.
- The granny squares are created individually, then seamed together to create the baby blanket. A zig zag slip stitch method is used to seam the granny squares together. Click this link to see how to make a zig zap slip stitch. Note - You can also use a seaming method that you prefer.
- The seaming portion of this pattern and the border are made in the color G (Sand Castle). Note - You can always use a different color for this part. You will have enough yarn left over from making the granny squares.
- An optional single crochet border is made around the blanket. Instructions on how to make the border are given at the end of the pattern.

Log Cabin Crochet Baby Blanket Pattern
Make 30 granny squares.
Start with a magic circle (alternatively, you can also chain 5, and join with a slipstitch to the first chain to form a loop).
Row 1: Using color A, ch 3 (counts as first dc and throughout), 2 dc in circle, (ch 3, 3 dc in circle) 3 times, ch 3, join with a sl st to top of 3rd ch at the beginning of the round.
Turn and continue on with color A for one more round.
Row 2: ch 3 (counts as first dc), (2 dc, ch 3, 3 dc) in same 3 ch sp, *ch 1, (3 dc, ch 3, 3 dc) in next 3 ch sp; rep from *twice more, ch 1, join with a sl st to top of 3rd ch at the beginning of the round.
Fasten off. Now you will work with color B and color C.
Row 3: Using color B, join yarn with a sl st to corner sp, ch 3, and work 2 dc. ch 1, 3 dc in next 1 ch sp. ch 1, (3 dc, ch 3, 3 dc) in next corner sp. ch 1, 3 dc in next 1 ch sp. ch 1, and make 3 dc in corner sp. Switch to color C, ch 3, and make 3 dc in corner sp.
Now you're going to finish the round in color C. Continue by working a ch 1, 3 dc in next 1 ch sp. ch 1, (3 dc, ch 3, 3 dc) in next corner sp. ch 1, 3 dc in next 1 ch sp. ch 1, and make 3 dc in corner sp. ch 3, and join with a sl st to top of 3rd ch at the beginning of the round.
Turn and continue on with color C.
Row 4: Make a sl st in corner sp, ch 3, and work 2 dc in corner sp. *ch 1, 3 dc in next 1 ch sp; rep from *1 more time. ch 1, (3 dc, ch 3, 3 dc) in next corner sp. *ch 1, 3 dc in next 1 ch sp; rep from *1 more time. ch 1, and make 3 dc in corner sp. Switch back to color B, ch 3, and make 3 dc in corner sp.
Then *ch 1, 3 dc in next 1 ch sp; rep from *1 more time. ch 1, (3 dc, ch 3, 3 dc) in next corner sp. *ch 1, 3 dc in next 1 ch sp; rep from *1 more time. ch 1, and make 3 dc in corner sp. ch 3, and join with a sl st to top of 3rd ch at the beginning of the round.
Fasten off. Now you will work with color D and color E.
Row 5: Using color D, join yarn with a sl st to corner sp, ch 3, and work 2 dc. *ch 1, 3 dc in next 1 ch sp; rep from * 2 more times. ch 1, (3 dc, ch 3, 3 dc) in next corner sp. *ch 1, 3 dc in next 1 ch sp; rep from * 2 more times. ch 1, and make 3 dc in corner sp. Switch to color E, ch 3, and make 3 dc in corner sp.
Now you're going to finish the round in color E. Continue by working a *ch 1, 3 dc in next 1 ch sp; rep from * 2 more times. ch 1, (3 dc, ch 3, 3 dc) in next corner sp. *ch 1, 3 dc in next 1 ch sp; rep from * 2 more times. ch 1, and make 3 dc in corner space. ch 3, and join with a sl st to top of 3rd ch at the beginning of the round.
Turn and continue on with color E.
Row 6: Make a sl st in corner sp, ch 3, and work 2 dc in corner sp. *ch 1, 3 dc in next 1 ch sp; rep from * 3 more times. ch 1, (3 dc, ch 3, 3 dc) in next corner sp. *ch 1, 3 dc in next 1 ch sp; rep from *3 more times. ch 1, and make 3 dc in corner space. Switch back to color D, ch 3, and make 3 dc in corner sp.
Then *ch 1, 3 dc in next 1 ch sp; rep from *3 more times. ch 1, (3 dc, ch 3, 3 dc) in next corner sp. *ch 1, 3 dc in next 1 ch sp; rep from *3 more times. ch 1, and make 3 dc in corner space. ch 3, and join with a sl st to top of 3rd ch at the beginning of the round.
Fasten off. Now you will work with color F and color G.
Row 7: Using color F, join yarn with a sl st to corner sp, ch 3, and work 2 dc. *ch 1, 3 dc in next 1 ch sp; rep from *4 more times. ch 1, (3 dc, ch 3, 3 dc) in next corner sp. *ch 1, 3 dc in next 1 ch sp; rep from *4 more times. ch 1, and make 3 dc in corner space. Switch to color G, ch 3, and make 3 dc in corner sp.
Now you're going to finish the round in color G. Continue by working a *ch 1, 3 dc in next 1 ch sp; rep from *4 more times. ch 1, (3 dc, ch 3, 3 dc) in next corner sp. *ch 1, 3 dc in next 1 ch sp; rep from *4 more times. ch 1, and make 3 dc in corner sp. ch 3, and join with a sl st to top of 3rd ch at the beginning of the round.
Turn and continue on with color G
Row 8: Make a sl st in corner sp, ch 3, and work 2 dc in corner sp. *ch 1, 3 dc in next 1 ch sp; rep from *5 more times. ch 1, (3 dc, ch 3, 3 dc) in next corner sp. *ch 1, 3 dc in next 1 ch sp; rep from *5 more times. ch 1, and make 3 dc in corner sp. Switch back to color F, ch 3, and make 3 dc in corner sp.
Then *ch 1, 3 dc in next 1 ch sp; rep from *5 more times. ch 1, (3 dc, ch 3, 3 dc) in next corner sp. *ch 1, 3 dc in next 1 ch sp; rep from *5 more times. ch 1, and make 3 dc in corner sp. ch 3, and join with a sl st to top of 3rd ch at the beginning of the round.
Fasten off. You have now completed 1 granny square. Continue by making 29 more granny squares, for a total of 30 granny squares.
Placement of Granny Squares
Once all squares have been made, it's time to assemble and seam your granny squares together. The two graphs down below show the placement of each granny square.
The first graph shows how to place each granny square and the second graph shows you an actual image of what your granny squares should look like when all granny squares have been put in the right order.
Instructions for the first graph: place each granny square according to the graph down below. "L" - place the light side first (light pinkish color). "D" - place the dark side first (dark green color).
First Graph

Second Graph
Seaming
Once you have your granny squares in the correct order, it's time to seam each square together using the zig zag slip stitch method (notes section includes a link on how to seam using this technique).
Start on the right side using the color G (Sand Castle) and work your way upwards. Once you have finished one row, continue to seam the other 4 rows (for a total of five rows). Then seam all five rows together for a completed blanket.
Border
Once you have seamed all 30 squares together, it's time to work a single crochet border around the blanket. Work the single crochet border in the color G (Sand Castle) as follows:
Work 1 single crochet per stitch along each of the sides, and work 2 single crochet stitches in each corner stitch. Work a total of 6 rounds of single crochet around the blanket.
Note - if you find that your corners are rounding, add an additional single crochet stitch in each of your corner stitches.
When you have finished making 6 rounds of single crochet, fasten off, and work in any remaining ends. You're finished.

I hope you enjoyed making this patchwork inspired crochet baby blanket pattern. If you did, then don't forget to pin this post to share with other crocheters.
-Nicky